When I started modeling with MagicDraw in university, it was version 8.0. Even then, MagicDraw had nice productivity features and I really loved their shortcut keys when drawing diagrams. Now we have MagicDraw 18.0 version as long-term release (supported till the next big release) and feature releases are coming every half a year with improved modeling experience.
I appreciate when a tool enables me to do my job well and quickly. I can confirm that the MagicDraw team is working hard to release solutions to provide a better modeling experience. In this blog post I will share my top 5 favorite ways to help you to improve modeling productivity with MagicDraw. They were collected during workshops and training sessions for our clients:
- Quickly Apply Style for Symbols in Diagram
- Drag and Drop Element on the Symbol or Diagram
- Draw Diagram without Long Mouse Trip
- Easy Edit of Elements in a Table Format
- Create Diagram from Existing Elements in Seconds
1. Quickly Apply Style for Symbols in Diagram
This is my favorite and frequently used functionality when I prepare diagrams for sharing with my clients or colleagues and want to apply a nice style. This approach is similar to the Format Painter functionality used in Microsoft Office tools like Word, and Outlook.
What you should do is just copy the symbol style and apply it on other symbol(s).
Let‘s see in example how it works.
In Figure 1 I have desired style for the class: blue color for text, displayed attributes and operations compartments, bigger font size for name and white color with blue borders. All these you can set in Symbol Properties dialog.
After symbol is selected you should copy style using shortcut Ctrl + C (Cmd + C for Mac users).
Copy Style – Ctrl + C
Paste Style – Ctrl + Shift + V
There are two bubbles in Figure 1 showing that you can set one style for the class (1) and another style for the relationships (2). So, in the next steps we will apply two styles for both sets of symbols – classes and relationships.
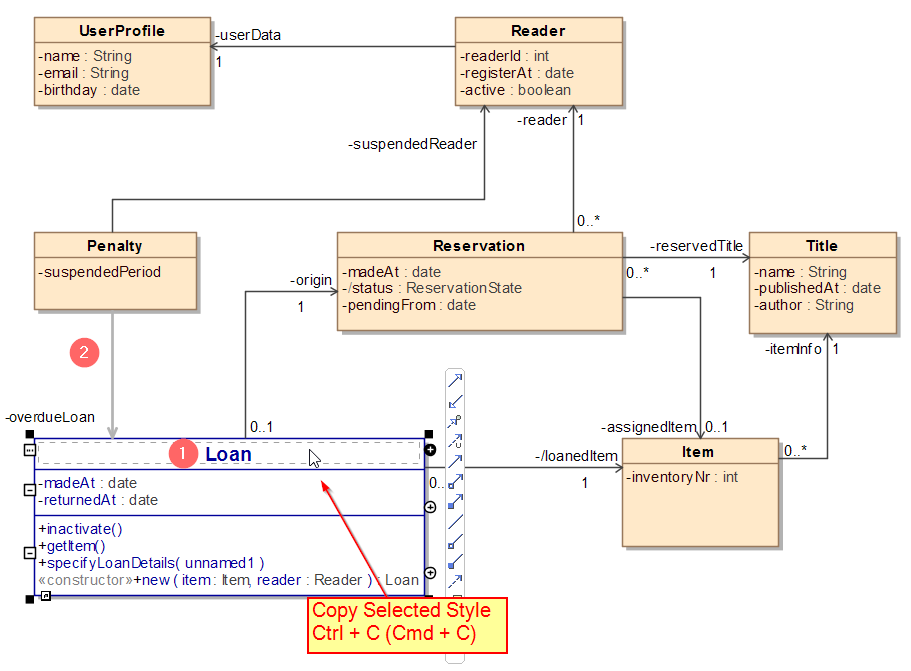
Figure 1. Copy style of the selected symbol
After the style is copied we need to select symbols to which this style should be applied.
TIP: you can hold Shift key to select a couple of symbols or Alt key to select all the same type elements (all classes or all associations).
When symbols are selected, the last step is to apply the style using the shortcut Ctrl + Shift + V (Cmd + Shift + V for Mac users). See the results in Figure 2: style is applied for classes and relationships.
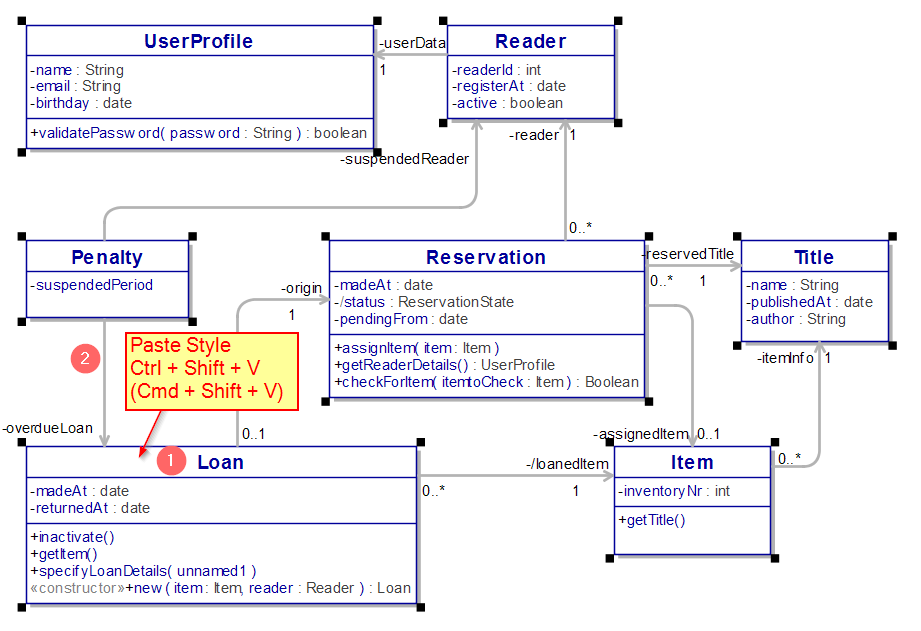
Figure 2. Paste style for the selected symbols
2. Drag and Drop Element on the Symbol or Diagram
As drag and drop functionality is naturally expected behavior in the tool from the end user perspective, MagicDraw team is working hard to improve the drag and drop user experience and reduce the number of manual steps required in different situations. This is why in some cases one drag and drop action can reduce two or more manual steps when you are modeling with MagicDraw.
Most of the drag and drop functionality is used this way: drag the element from the model browser (containment tree) and drop into the diagram (on empty space in the diagram area, shape, line or inside the shape). When you drag the element on the diagram empty area it will create a symbol depending on the diagram type. If you drag the element on diagram symbols like shape or line, it should be highlighted with blue color and a tooltip displayed showing what will happen after dropping the element.
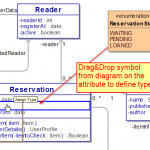
Check the example in Figure 3, where the Enumeration element ReservationStatus is dragged and dropped on the attribute and MagicDraw automatically assigns the type for it.
There is also possibility to drag and drop symbols directly from the diagram as shown in Figure 4.
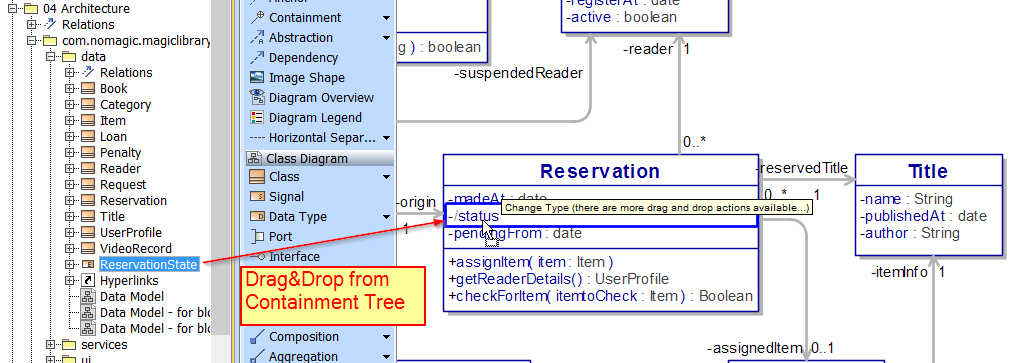
Figure 3. Drag & drop Enumeration on the attribute to define type
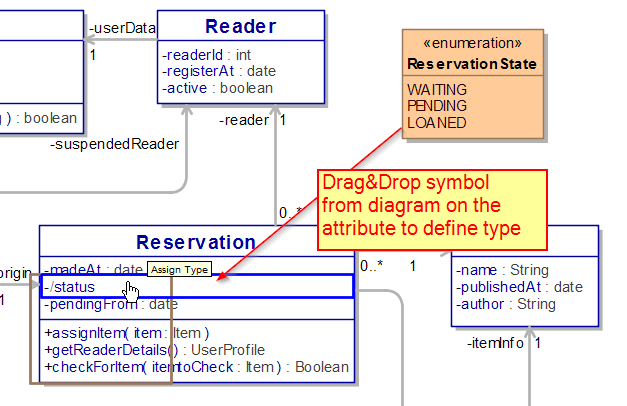
Figure 4. Drag and drop Enumeration from the diagram on the attribute to define type
Have in mind that drag and drop result directly depends on the element and diagram types.
For example, if you drag and drop signal element to the class diagram, MagicDraw will create symbol similar to the class. Dropping the same signal on the transition in a state machine diagram will create a trigger with defined properties as a SignalEvent event type and specified signal (see in Figure 5).
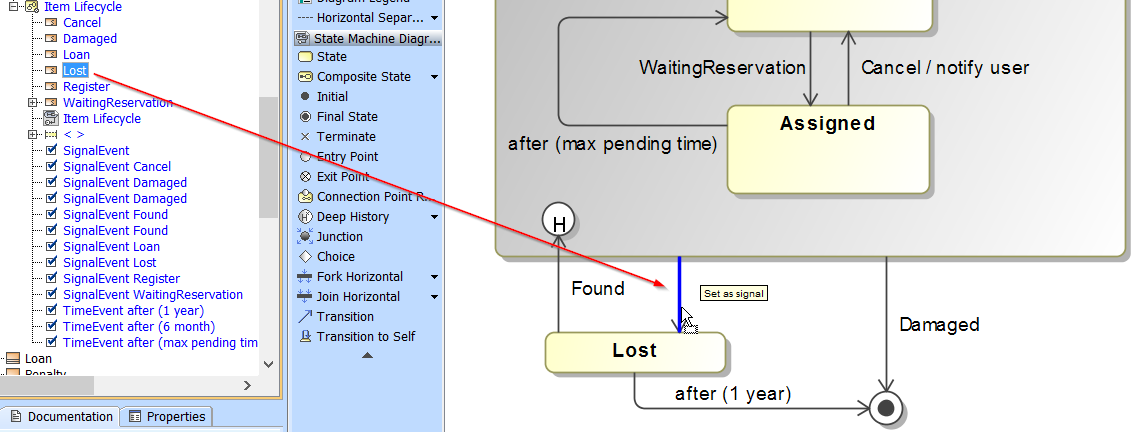
Figure 5. Drag and drop signal on the transition to create SignalEvent and assign signal
TIP: when you drag and drop a diagram element from the model browser to a diagram, a diagram symbol will be created referencing that diagram view. In this way, you can create nice navigation between related diagrams having an introduction page and referencing to the other most important diagrams in your project.
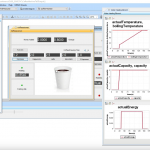
For example, check this web report which has links to the diagrams.
3. Draw Diagram without Long Mouse Trip
Drawing diagrams can take a bit if you assess time spent on moving mouse from diagram toolbar to the diagram, back again and again…
Looking to the 5S Technique which says in a well-organized environment there should be “a place for everything and everything in its place, when you need it” we can state something similar about our drawing experience. We also have in place the most important things and you don’t need to make long trips with a mouse if you are using the smart manipulator and context menu.
How to use it?
When you select an element in the diagram, the smart manipulator should appear with most expected relationships and sometimes additional functionality (see in Figure 6). After selecting the specific relationship, you can choose possible target elements from the context menu which you can activate with the right mouse click (see in Figure 7).
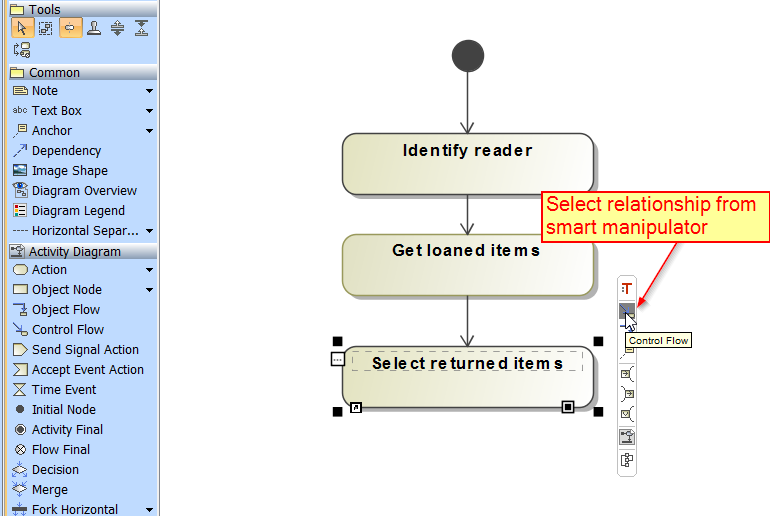
Figure 6. Select symbol in the diagram and choose relationship from smart manipulator
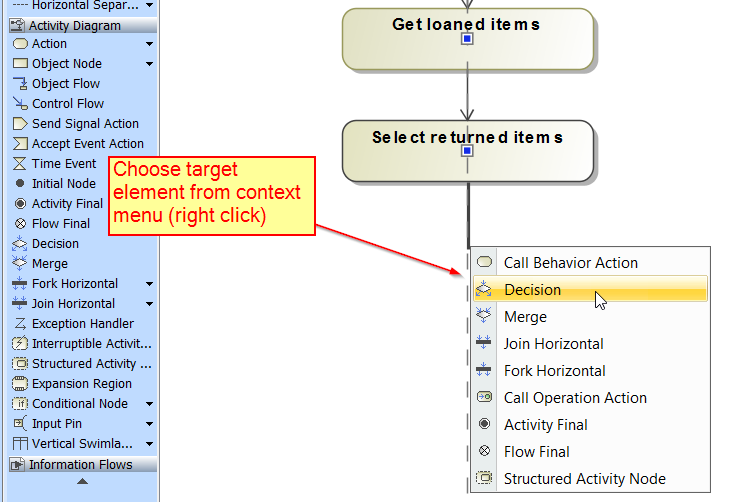
Figure 7. After clicking context menu (right click) choose target element
So, now reduce your time and focus directly on the quick diagram creation. This approach is especially useful in activity, state machine, and class diagrams.
By the way, smart manipulators and target elements can be customized as well, but this is more advanced topic and if you want to hear about it let us know.
4. Easy Edit of Elements in a Table Format
If you prefer a table style for editing information, then generic tables are the right choice. They are very flexible: you can define what type elements should be displayed in the table (see in Figure 8, Part (1)) and automatically collect them from specific scope (2). There is also a nice feature allowing you to switch on/off columns which represent element properties (3) and then you can directly edit texts or other values.
In generic tables, you can filter rows by visible column values (4) and also export visible content to a Microsoft Excel spreadsheet (5).
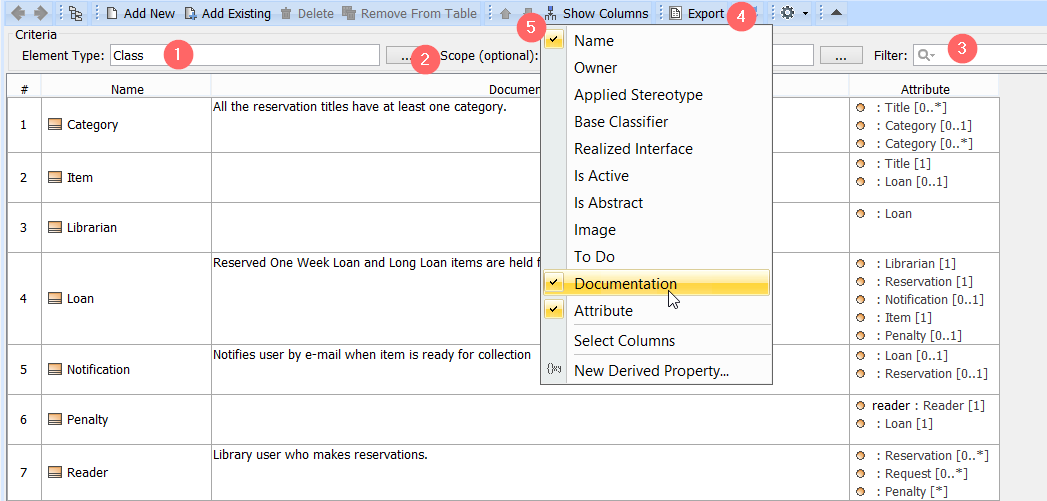
Figure 8. After clicking context menu (right click) choose target element
I usually use tables to describe documentation or prepare list of elements which I want to export to an Excel spreadsheet. One functionality changing a role of generic tables is presented in MagicDraw 18.1 – Copy table with columns and paste it to generic table as elements. I love it and certainly recommend it to test!
5. Create Diagram from Existing Elements in Seconds
One of the modeling tool advantages compared to drawing tools is that elements created in a diagram are stored in the model. This means that the diagram is the model and it opens the possibility for the reuse of information in other diagrams.
Here we want to give you a hint on how MagicDraw can help in creating diagrams from the model: displaying related elements and displaying paths.
Display related elements
Let’s say that we want to create class diagram which focuses on the main class and other classes directly related to it. Then we can drag and drop class element to the diagram and from the context menu select the “magic” menu – Display Related Elements (see in Figure 9).
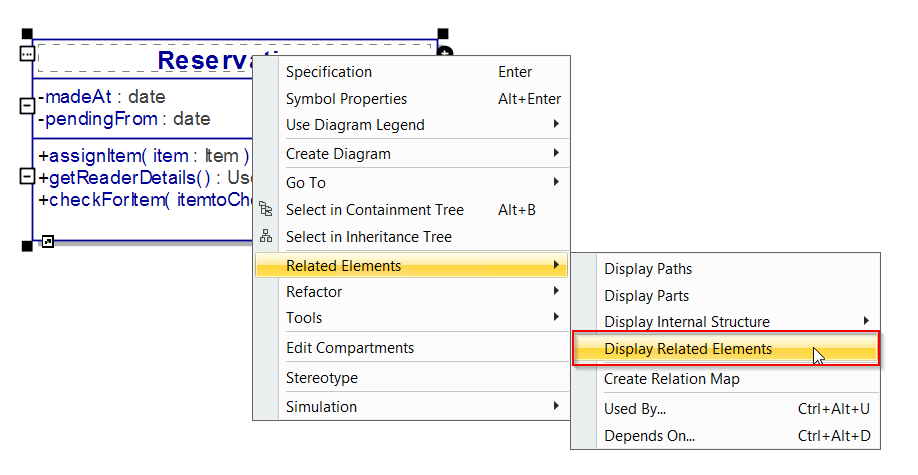
Figure 9. Context menu for Display Related Elements
In the Display Related Elements dialog you will get some options (see in Figure 10):
- Choose which relations should be taken into account when looking for related elements.
- Select which direction relationships should be taken (I usually leave default: both)
- The scope which I leave default: whole model because there can be relations with elements from different model locations.
- Depth can help you to get the indirectly connected elements in the diagram.
- Don’t select this checkbox if you already have more elements in the diagram because it can create additional symbol copy.
- Quick layout will make automatically created diagram readable
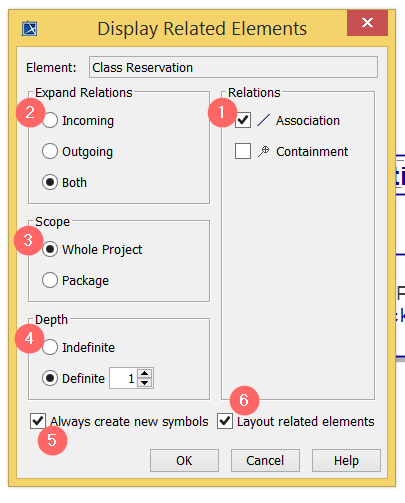
Figure 10. Display Related Elements dialog
After displaying related elements you can work with symbol style, diagram layout (if you don’t like the automatic one) and here you have a newly created diagram.
Display paths
The other option to create a diagram quickly is by dragging and dropping elements to the diagram and displaying the relationships which exist between them. You need to select all elements in the diagram (see in Figure 11 part (1)) and then from right mouse click context menu choose to Display Paths (2). All relations which exist between selected elements will be displayed in the diagram.

Figure 11. Context menu for Display Paths
Wrap-up
We have covered my 5 favorite tips and tricks to help increase modeling productivity in MagicDraw. What about yours? Maybe you have your own favorite – let us know about it in comments.
Thanks for your time and have good modeling moments with MagicDraw!